That’s it! You have now set up a simple file upload system using AJAX in Codeigniter 3.
In this post, we will discuss how to upload a file using AJAX in Codeigniter 3. This method allows us to upload files without refreshing the page, providing a seamless user experience.
First, download and install Codeigniter 3 from the official website. Once installed, configure your base URL and database settings in the application/config directory.
Create a new controller named File_upload.php in the application/controllers directory. This controller will handle the file upload process.
<?php
defined('BASEPATH') OR exit('No direct script access allowed');
ini_set('erro_reporting', 0);
#[AllowDynamicProperties]
class File_upload extends CI_Controller {

    function __construct() {
        parent::__construct();
        $this->load->helper(array('form', 'url'));

    }

	public function index() {
		$data 					= [];
		$data ['content_title'] = 'File Upload';
		$this->load->view('file_upload/upload', $data);
	}

	function upload_config($path) {
		if (!is_dir($path))
			mkdir($path, 0777, TRUE);
		$config['upload_path'] 		= './'.$path;
		$config['allowed_types'] 	= '*';
		$config['max_filename']	 	= '255';
		$config['encrypt_name'] 	= TRUE;
		$config['max_size'] 		= 4096;
		$this->load->library('upload', $config);
	}

	function showSuccessMessage($message) {
	    return '<div class="alert alert-success alert-dismissible" role="alert">
	                <button type="button" class="close" data-dismiss="alert" aria-label="Close"><span aria-hidden="true">×</span></button>
	                <strong>Great!</strong>
	                '.$message.'
	            </div>';
	}

	function showErrorMessage($message) {
	    return '<div class="alert alert-danger alert-dismissible" role="alert">
	                <button type="button" class="close" data-dismiss="alert" aria-label="Close"><span aria-hidden="true">×</span></button>
	                <strong>Oh snap!</strong>
	                '.$message.'
	            </div>';
	}

}
Next, create a new view named upload.php in the application/views/file_upload directory. This view will contain the HTML form for file upload.
<!DOCTYPE html>
<html lang="en">
<head>
<title><?php echo $content_title; ?></title>
<meta charset="utf-8">
<meta name="viewport" content="width=device-width, initial-scale=1">
<link rel="stylesheet" href="https://cdn.jsdelivr.net/npm/bootstrap@4.6.2/dist/css/bootstrap.min.css">
<script src="https://ajax.googleapis.com/ajax/libs/jquery/3.7.1/jquery.min.js"></script>
<script src="https://cdn.jsdelivr.net/npm/bootstrap@4.6.2/dist/js/bootstrap.bundle.min.js"></script>
</head>
<body>
<div class="container mt-5">
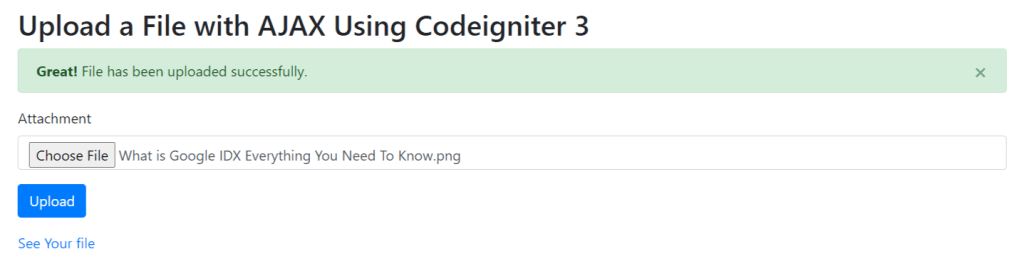
<h2>Upload a File with AJAX Using Codeigniter 3</h2>
<div class="result"></div>
<form id="form-upload-file" method="post" autocomplete="off" enctype="multipart/form-data">
<div class="form-group">
<label>Attachment</label>
<input type="file" class="form-control" name="file" id="attachment" placeholder="Attachment">
</div>
<div class="form-group">
<button type="submit" id="btn-upload" class="btn btn-primary">Upload</button>
</div>
<div class="form-group file-result">
</div>
</form>
</div>
<script>
$(document).ready(function() {
$("body").on("submit", "#form-upload-file", function(e) {
e.preventDefault();
var data = new FormData(this);
$("#btn-upload").prop('disabled', true);
$.ajax({
type : 'POST',
url : '<?php echo base_url("file/upload"); ?>',
data : data,
dataType : 'json',
contentType : false,
cache : false,
processData :false,
beforeSend : function() {
$("#btn-upload").prop('disabled', true);
},
success : function(result) {
if($.isEmptyObject(result.error_message)) {
$(".result").html(result.success_message);
$(".file-result").html(result.html);
} else {
$(".result").html(result.error_message);
}
$("#btn-upload").prop('disabled', false);
}
});
})
});
</script>
</body>
</html>
Finally, we need to handle the AJAX request in the do_upload function of our File_upload.php. This function will process the uploaded file.
public function upload() {
		$path 		= 'documents/';
		$this->upload_config($path);
		if (!$this->upload->do_upload('file')) {
			$json = [
				'error_message' => $this->showErrorMessage($this->upload->display_errors()),
			];
		} else {
			$file_data 	= $this->upload->data();
			$file_name 	= $path.$file_data['file_name'];
			$json 		= [
				'success_message'	=> $this->showSuccessMessage('File has been uploaded successfully.'),
				'html'				=> '<a href="'.base_url($file_name).'" target="_blank">See Your file</a>',
			];
		}
		echo json_encode($json);
	}
$route['file/upload/example'] = 'File_upload/index';
$route['file/upload'] = 'File_upload/upload';